
前一节我们使用 Spring Cloud Config 集中管理配置文件,并通过 Config Client 远程刷新。但是这样做有一个明显的问题,就是单独刷新每一个服务会随着服务的数量增加变得越来困难。Spring Cloud 提供了一种消息总线的模式,通过消息中间件把消息路由到各个服务来实现统一刷新服务配置,可以让问题变得简单。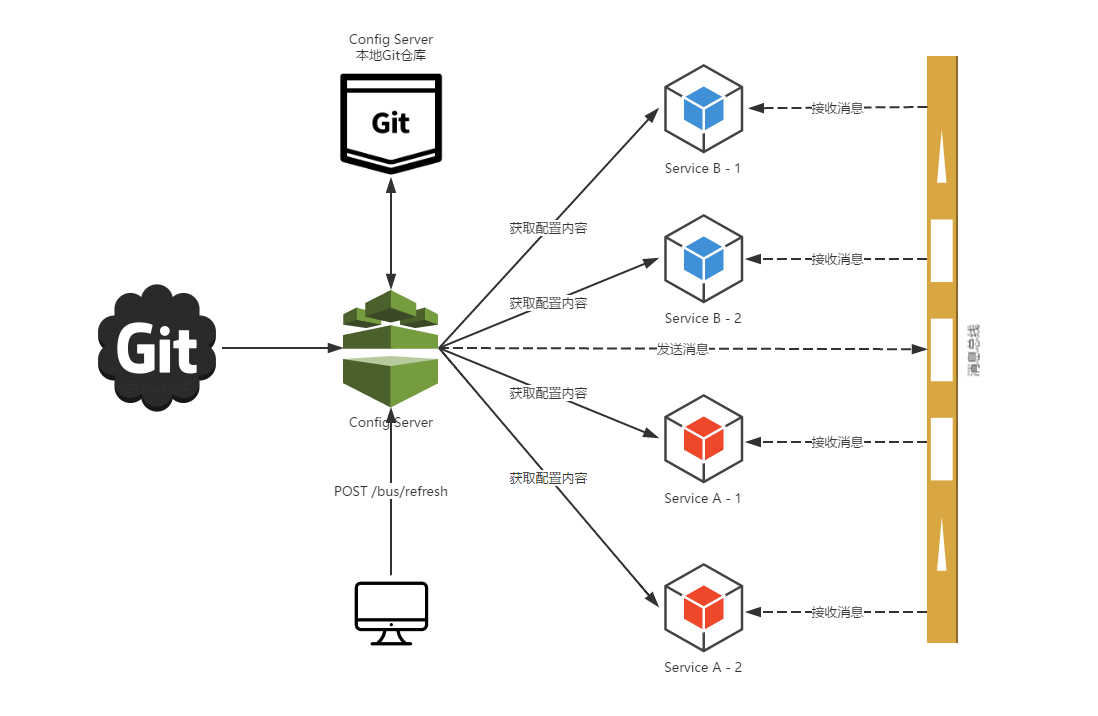
使用 Spring Cloud Bus 需要在原来 Spring Cloud Config 的基础上稍作改动。
首先把需要用总线联系的服务中加入 Spring Cloud Bus 的配置。
<dependency>
    <groupId>org.springframework.cloud</groupId>
    <artifactId>spring-cloud-starter-bus-amqp</artifactId>
</dependency>
然后加入消息中间件的配置
spring:
  rabbitmq:
    host: localhost
    port: 5672
    username: guest
    password: guest
server 和 client 都需要加。完成后,通过 POST /actuator/bus-refresh 刷新 Config Server 就可以动态更新所有服务配置了。
webhooks
主动刷新 config-server 的方式虽然比单独刷新 client 的方式简便,但是利用 git webhooks 完成配置修改后自动刷新则更加方便。下面以 gitlab 为例:
首先在 gitlab 中配置 integrations,url 为 config-server 的刷新地址,即 http:localhost:8888/actuator/bus-refresh 。由于 gitlab 不能配置本地 localhost ,所以需要借助一个小工具 natapp ,具体用法参考 https://natapp.cn/ 。简单配置之后就可以将 localhost 映射成外网地址,比如 http://r44n2x.natappfree.cc/actuator/bus-refresh 。由于 spring cloud bus的 bug 导致直接在 gitlab 上配置 /actuator/bus-refresh 并不会触发刷新,所以我们需要转发一下请求。
@PostMapping(value = "/refresh-config")
public void refresh() {
    RestTemplate restTemplate = new RestTemplate();
    HttpHeaders headers = new HttpHeaders();
    headers.setContentType(MediaType.APPLICATION_JSON_UTF8);
    HttpEntity<String> entity = new HttpEntity<String>("", headers);
    restTemplate.exchange("http://localhost:8888/actuator/bus-refresh", HttpMethod.POST, entity, String.class);
}
在 config-server 上添加一个服务,然后将 gitlab 的 webhoots 的 url 换成 http://r44n2x.natappfree.cc/refresh-config ,保存之后再更新配置即可看到效果。